Things to consider when buying snowshoes and a review of MSR Lightning snowshoes.
Many years ago we bought basic, inexpensive snowshoes on a whim.
They were just ok – we’d tire quickly, they were cumbersome, hard to get on and off, and my hips would inevitably hurt… so they started to languish in the basement, taunting us with each snowfall.
It became obvious we should have done a little homework before popping on them.
Now that we’ve finally got snowshoes we like, we figured what we researched and why we decided on the MSR Lightnings might be helpful to others looking to buy snowshoes.
Note: This is our own purchase and was not supplied by any company for review.

Choosing a snowshoe
Some major factors to consider when selecting snowshoes:
Terrain
Consider the type of terrain and snow type of the area you’ll usually snowshoe in:
- Climbing hills/mountains
- Rolling terrain, flat fields
- Packed snow, icy trails
- Fluffy, deep powder; off trail
Related: Gifts for Hikers | Hiking Clothing | Hiking Footwear
Length
Snowshoes usually come in 22”, 25” and 30” sizes. Your weight (including clothes, boots, pack) dictates the length needed.
The more weight, the longer the snowshoe needs to be to keep from sinking too much in the snow.
If you fall near the cutoff between sizes, consider getting the shorter pair. Longer snowshoes will weigh more and can be harder to walk in.
Other criteria:
- Ease of getting in and out of the binding, with gloves.
- Heel bar to lessen leg fatigue when going uphill.
- Gals should look for women-specific models as our hip design gives us a narrower gait.
See Also: Snowshoe Guide | Snowshoeing in New Jersey
The mistakes we made with our first snowshoes (aka hindsight is 20-20 and you get what you pay for):
- They were too low-end, with bindings that were a pain to fasten.
- Although correct for our weight, they were too long, cumbersome, almost… floppy.
- I didn’t realize there were women-specific models. My hips hated me for this. Hated.
- They’d hit against each other sometimes. The Axis Gait bindings (see below) were a revelation.

MSR Lightning Snowshoe
We decided on the MSR Women’s Lightning Axis 22 and the MSR Lightning Axis 25. While these exact models are no longer available the Lightning Explore is the comparable model.
Why we chose the MSR Lightnings
We mainly snowshoe in central New Jersey where rolling terrain and flat fields are the norm, but wanted the option to climb a little if we headed to north Jersey or elsewhere.
Trails on the east coast tend to get packed down and become icy from freeze-thaw cycles, but if we’re the first on trail then it might be powder.

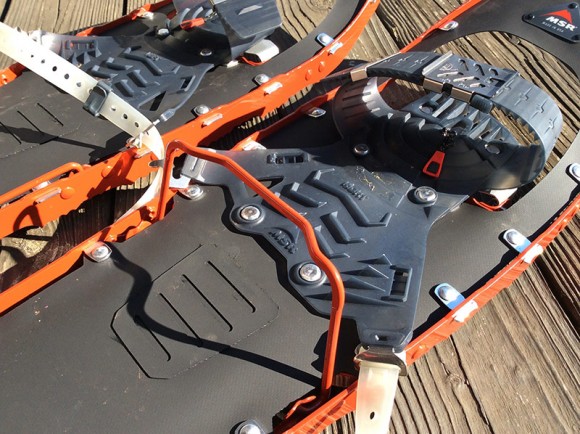
The Lightning has traction along the edges and a flip-up heel bar to reduce fatigue on uphills. (For more aggressive and mountainous terrain consider the MSR Lightning Ascent)
We also liked the step-in adjustable binding – set it for your boot size and then just step in and out from then on.
See Also: Winter Hiking | Traction Devices
It also allows fine tuning of foot angle to accommodate your natural toe-in or toe-out position (fancy pants term: Axis Gait Technology).
This helps to prevent the shoes from clacking into each other.

You’ll know they are set correctly when you leave parallel tracks in the snow, so we took them for a spin at a local field at first snowfall before taking them out on a trail.
This took a little futzing to get the angle set, but once it is, it stays. This is a vast improvement in comfort over our prior snowshoes.
We also wanted shorter ones than we had before but were concerned about flotation in powder.
MSRs have a option of adding “flotation tails” which gives us the flexibility of having a shorter, easier to maneuver shoe most of the time, with the option of increasing the length for the occasional deep powder.
See Also: Kuhl’s Renegade Pant | Kuhl’s Konfidant Air Pant | Kuhl’s Klash Pant | Kuhl’s Interceptr Jacket
Snowshoe Accessories
Trekking Poles
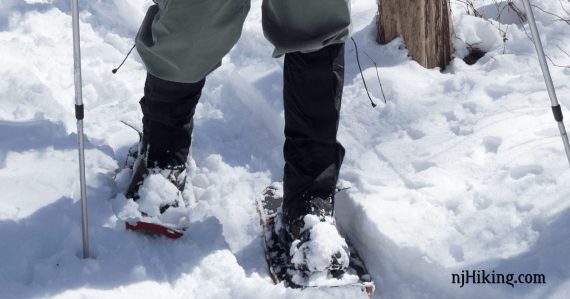
Similar to how ski poles are needed to cross country ski, it’s best to have poles for balance on snowshoes. We use the same poles that we use for hiking, with the addition of snow baskets.
Technically you don’t need poles but we wouldn’t go without them as it’s just too easy to get tangled up and topple over.
If you don’t normally hike with poles there’s no reason to buy anything fancy just for snowshoeing – a basic pair of trekking poles will do the trick.
Related: Trekking Pole Guide and Review
While not necessary, we find these additions to be worthwhile:
Gaiters
Gaiters cover the lower leg and over the top of the boot to keep snow out and pants from getting wet.
Snow Baskets
Regular trekking poles help with balance in the snow, too. But the small baskets that many trekking poles come with won’t prevent them from just slipping through the snow uselessly.
Wider snow baskets (also called powder baskets) can be swapped in for the smaller one. These usually aren’t universal as the attachment varies by pole brand (Leki, Black Diamond etc).

Flotation Tails
Extends the snowshoe by 5” for more flotation in deeper snow. Easy to attach, and can be put on while on the trail. The tails depend on model, so we got the MSR Lightning Tails.
Snowshoe Bag
Holds a pair of snowshoes, trekking poles, and flotation tails. It’s much easier to grab a bag and chuck it in the car instead of wrangling loose snowshoes and poles while pointy metal spikes catch on everything.
A snowshoe bag usually has backpack straps, fasteners to attach poles, and a possibly sleeve on the outside for a water bottle. The snowshoes slip into the bag easily, then the top is folded down and clipped shut.

Tips
Snowshoes can last a very long time so it’s worthwhile to spend a little time researching to find the right brand and model that works for your needs.
Other popular brands to look into are Atlas and Tubbs.
How much snow is on the ground? Snow Forecast and Snow Depth Maps
Overall
The MSR Lightning Snowshoes are a solid choice for to hikers looking to handle rolling/flat terrain with some hills, and the traction needed for packed/icy trails (like we get in New Jersey and the surrounding area).